How to install a CPU into an LGA 1700 or AM5 Socket
This guide provides a step-by-step process for installing a new CPU in the LGA 1700 and AM5 sockets. If you’re looking to build a PC but you’re a little worried about bending the pins in the new CPU, this guide is for you! It outlines the essential tools and components, as well as specific features of each socket type to ensure proper installation.
Which CPUs are LGA 1700?
LGA 1700 is the socket used for 12th and 13th generation Intel Processors.
Which CPUs are AM5?
Only AMD’s latest release, the Ryzen 7000 series is currently compatible with AM5 socket. Future releases will likely be based on this socket, as well.
What do I need to install a CPU?
Gather the following tools and components before proceeding:
- A compatible CPU for the LGA 1700 or AM5 socket
- A compatible motherboard
- Thermal paste
- A CPU cooler
- A clean, static-free work surface
- An anti-static wrist strap (optional)
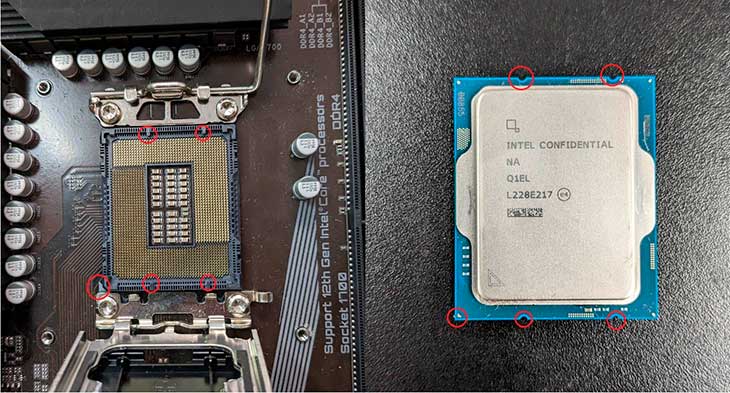
Examine the CPU and the corresponding socket on the motherboard. For the LGA 1700 and AM5 sockets, take note of the following pictures:
LGA 1700:
A triangle at the bottom left corner of the CPU/Socket and notches on the top and bottom of the socket to align the CPU.
AM5:
A triangle on the top left corner of the CPU/socket and notches at the top and bottom to align the CPU.
AVADirect Custom Computer’s Step-by-step guide to installing a CPU
- Place the motherboard on a clean, static-free surface. Connect the anti-static wrist strap to a grounded object if using one.
- Locate the load lever near the socket.
- Press down on the lever and push it away from the socket to release it.
- Lift the lever and the load plate covering the socket.
- Hold the CPU by its edges and avoid touching the contact points on the underside.
- Align the notches and triangles on the CPU with the notches and triangles on the socket.
- Lower the CPU gently into the socket without applying force.
- Lower the load plate onto the CPU.
- Hold the load lever and press down, sliding it under the retention tab.
- Place a small, pea-sized amount of thermal paste onto the center of the CPU. The pressure from the CPU cooler will distribute the paste evenly.
- Follow the installation instructions provided by the CPU cooler manufacturer.
The CPU installation is complete. Proceed with the remaining steps of the computer build or upgrade. Consult the motherboard and CPU cooler manuals for additional instructions or recommendations specific to the components used. Not trying to build a gaming PC yourself? Let our team our highly trained technicians do it for you! If you don’t know where to start with configuration a tower desktop on our website, talk to our sales team!
